Here is an easy homemade DIY whelping box with free plans that should be the perfect solution for your puppy whelping needs.
When you are expecting puppies to arrive, chances are, you will most likely be thinking about building or buying a whelping box.
This easy to make design with step by step instructions, and can be constructed in a weekend.
This box has been designed with a 2 tier door system which creates added safety and security of growing puppies.
Step by step instructions when building your DIY whelping box
- Gather the supplies you will need to build your DIY whelping box (use our supply list below)
- Prepare to cut out the door for your puppy whelping box. (You will need 1 piece of melamine for this step. Follow the instructions below for detailed cutting instructions
- Time to make the door slides for your puppy whelping box by following the steps and sizes below.
- Prepare the floor for your homemade whelping box. (You will need one piece of melamine for this step. Use the dimensions below for sizing information.)
- Cut the door tracks for your slides by using the dimensions listed below. This step will require the 48″ piece of melamine track.
- Assemble your DIY puppy whelping box using the steps below.
- Install the door slide tracks as described below.
- Preparing the pig rails for your DIY whelping box. This step will require PVC pipe and fittings. Follow the instructions below for dimensions ands instructions.
What is a whelping box?
A homemade whelping box is also known as a nesting box or whelping pen.
It is designed to protect puppies during birth (whelping) and in early life by keeping them safely contained.
They will be protected from cold, and safe from the danger of getting crushed or suffocated by the mother.
This whelping box design is long lasting, easy to clean, and a sanitary place for your puppies.
Plywood is NOT a recommended material to use for building a whelping box.
Plywood is a very porous material, because it can trap bacteria. This could lead to sickness in your litter.
It is also very difficult to clean, and not a long lasting option for a quality DIY whelping box.
Building a cardboard whelping box will achieve the same result as plywood, and is not a recommended solution.
With a few basic tools and materials, you can build this homemade puppy whelping box over a weekend.
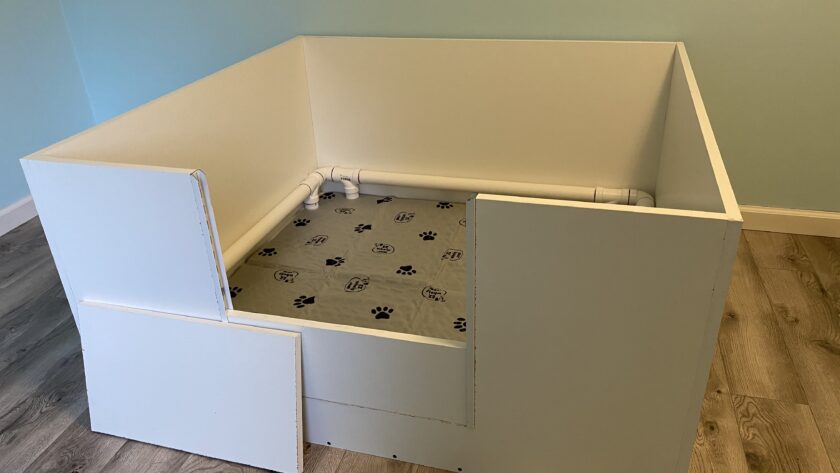
Overall Design
We breed German shorthaired pointers so this design is based on a box to fit a 55-75 pound dog.
Because German shorthaired pointers are a medium to large breed, so they will need some extra room to move around in their whelping box.
This design boasts a spacious 4 foot by 4 foot area that is also around 24″ high preventing the puppies from climbing out.
Door design
The door is a very important part of the homemade whelping box and also a great safety feature.
It allows mom to comfortably get in and out of the whelping box, while also containing the puppies inside.
This design has adjustable doors to assist in all stages of the puppies lives.
You can remove both doors to allow for easy access to the puppies and for mom to easily get in and out.
After about 2 weeks the puppies will be getting more mobile, therefore they will need additional space.
Adding the thin door option will still allow mom to easily get in and out but still contain the puppies in the whelping box.
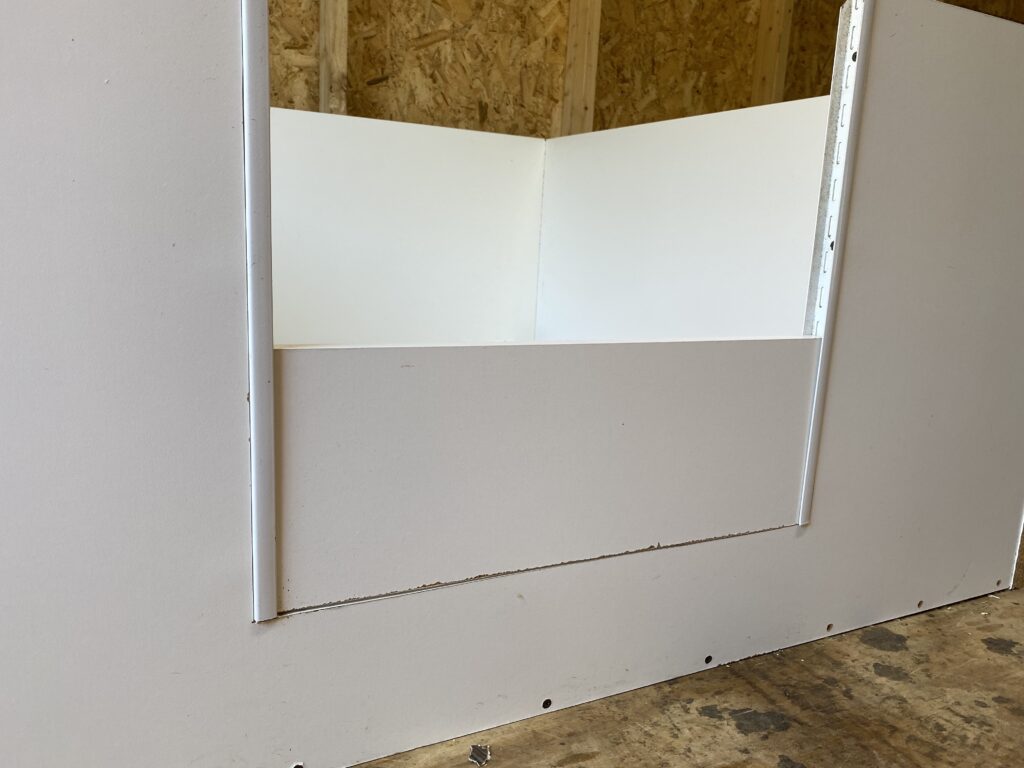
As the puppies get older and larger, the thicker door is a great option. Keep the small door slide removed.
Mom will still be able to get in and out, but the whelping box will still contain the puppies safely inside.
After mom has weaned the puppies, both doors can be used for the final stages of the puppies lives. This will assist in containing them in your homemade whelping box.
Pig rail design
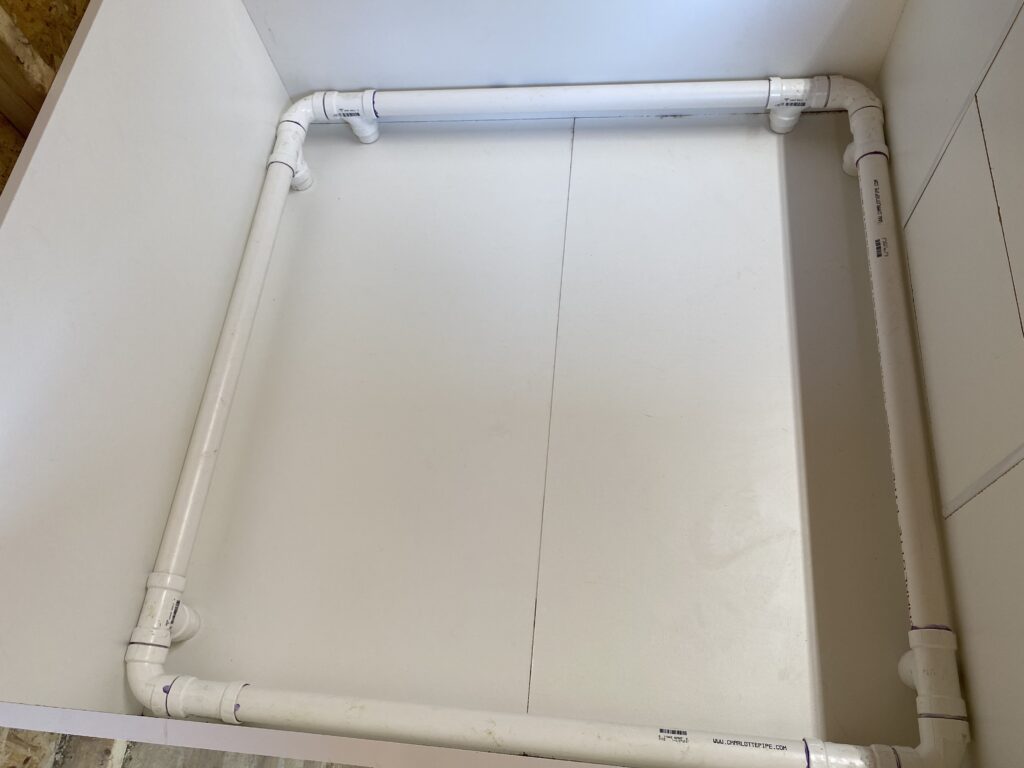
Pig rails are a very important part of your homemade whelping box.
Suffocation from mom laying on the puppies and pinning them between her and the wall is an enormous risk to newborn puppies.
Pig rails should be designed to allow room for puppies to crawl behind mom safely in the event of her laying down on them and pinning them against the wall.
Pig rails are a safety device that serves as a buffer between mom and the wall in a whelping box.
Supplies you will need
6 pieces of 48 X 23.75 X .75 Blue Hawk Melamine Shelving material (Lowes)
#6 2″ Drywall Screws (50 pack)
1 piece 48 inch Blue Hawk Double Track for shelving (Lowes)
4 pieces 90 degrees 1 1/2″ PVC elbows
8 pieces of 1 1/2″ PVC couplers
2 pieces of 10 foot length 1 1/2″ PVC pipe (Lowes)
8 pieces of 1 1/2” PVC bushings
1 roll of Melamine veneer Edging
1 package of PVC primer and glue combination
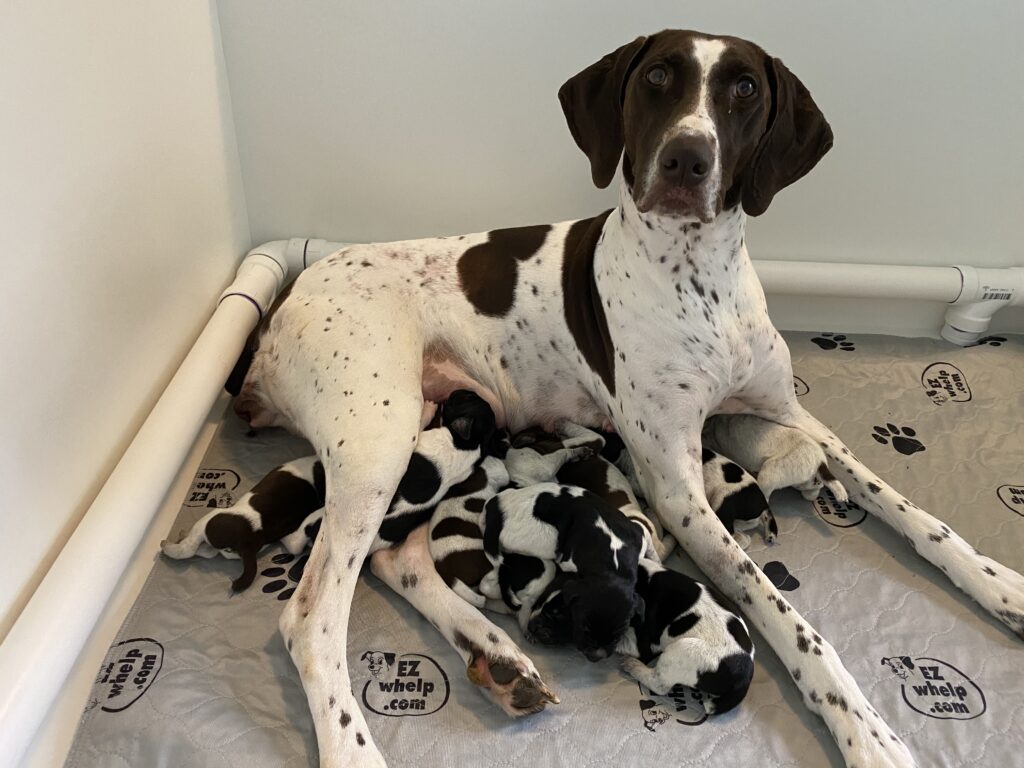
Whelping pads for easy cleanup.
Tools you will need
Table saw or circular saw for ripping
Phillips screwdriver bit for cordless drill
Grinder with cutoff wheel attachment
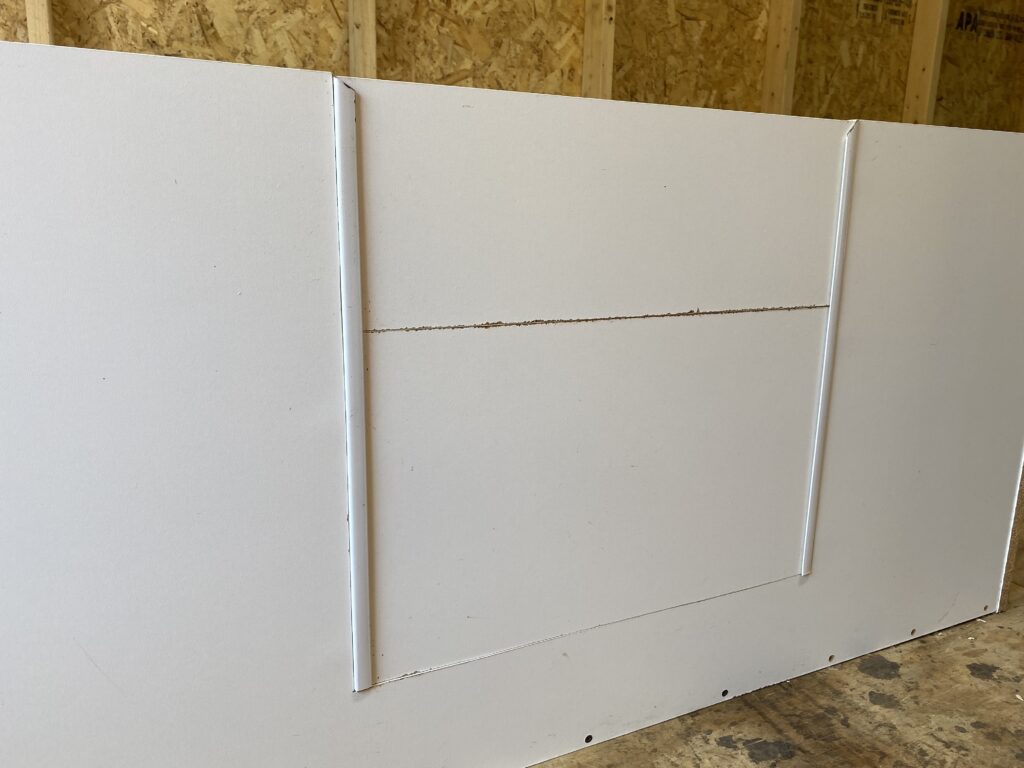
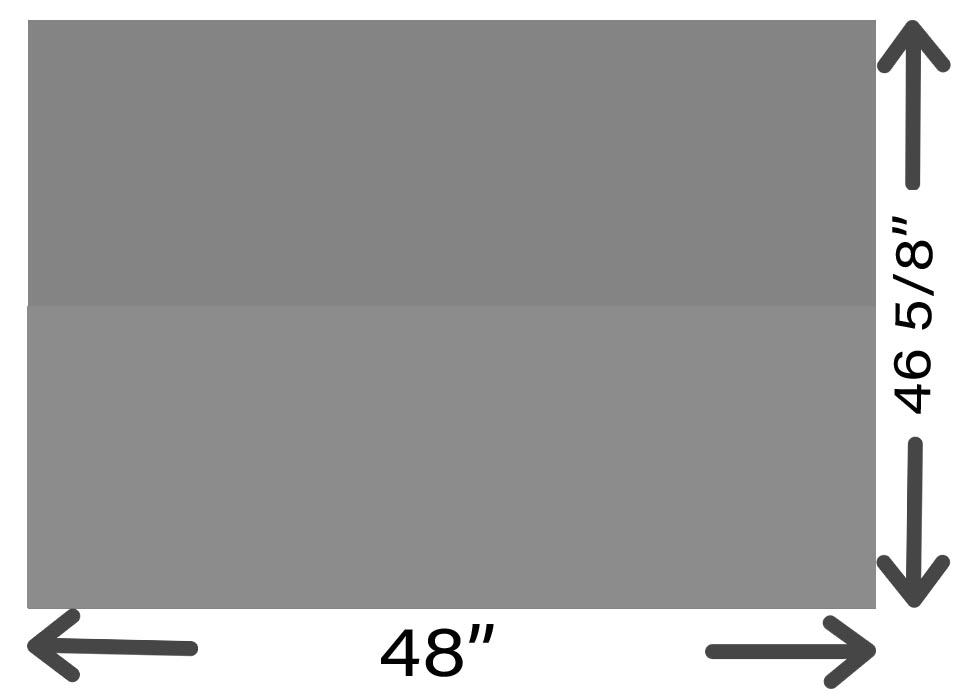
Preparing to cut out the door for your DIY puppy whelping box
You will need 1 piece of melamine for this step and also your circular saw and jigsaw.
Measure 14 inches from both ends of the melamine board and cut as shown in the diagram below.
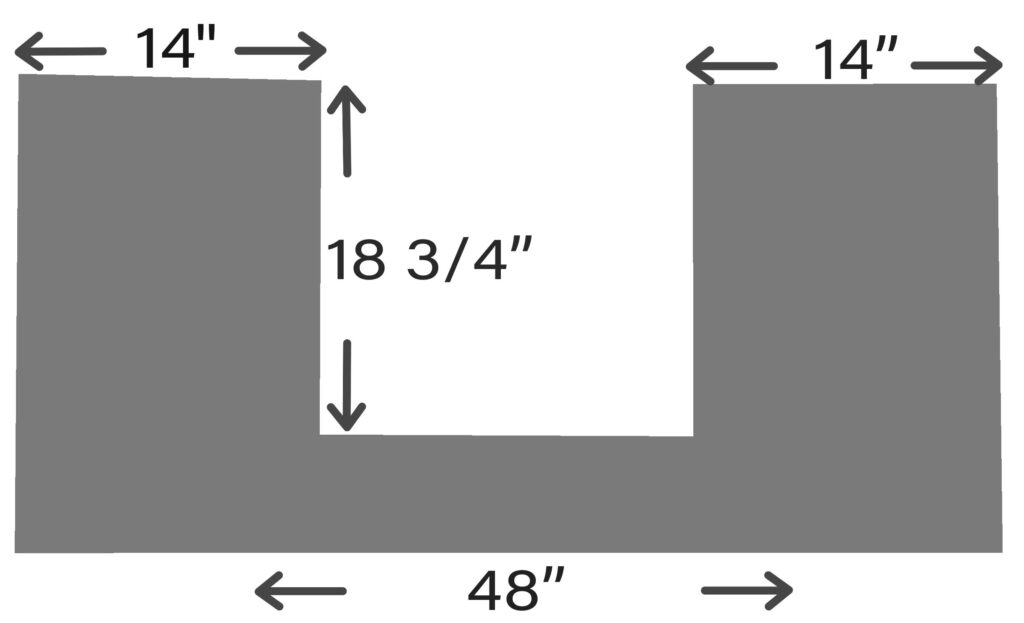
Use your square to mark the areas for the cutout.
It is important to use the jigsaw on the side cuts and your circular saw for the lower portion of the door. For the lower portion of the door, us your circular saw to create a starting cut and finish with your jigsaw.
This will allow you to cut out the door without having any over cutting occur.
Do not throw away your cutout as this will be used as your door slides.
**Pro tip** When cutting Melamine board, it is best to use masking tape to prevent any chipping.
Preparing the door slides for your DIY puppy whelping box
Using the cutout from the previous step, trim the length down to 19 5/8″. This should not be much to remove. You can use your circular saw or jigsaw for this step.
This will allow the doors to slide easily in the track when installed.
Next, you will need to measure 7″ as shown in the diagram below and cut your door in two pieces using your table saw or jigsaw.
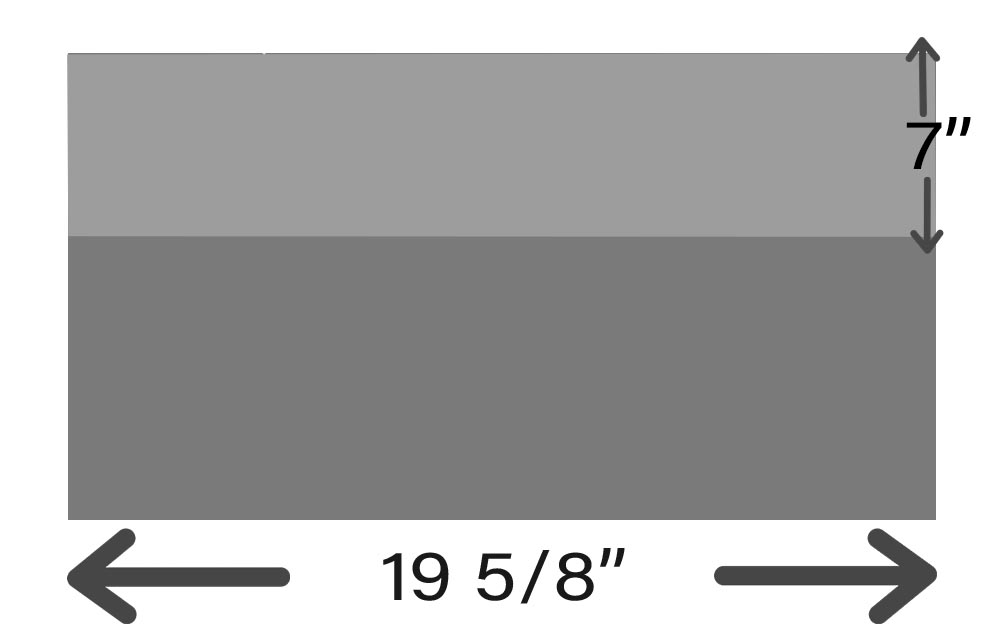
For the final step of the door preparation, you will need the Melamine roll of edging. Run a bead completely around the outer edge of both door pieces. Use your heating iron to adhere the edging to the door pieces.
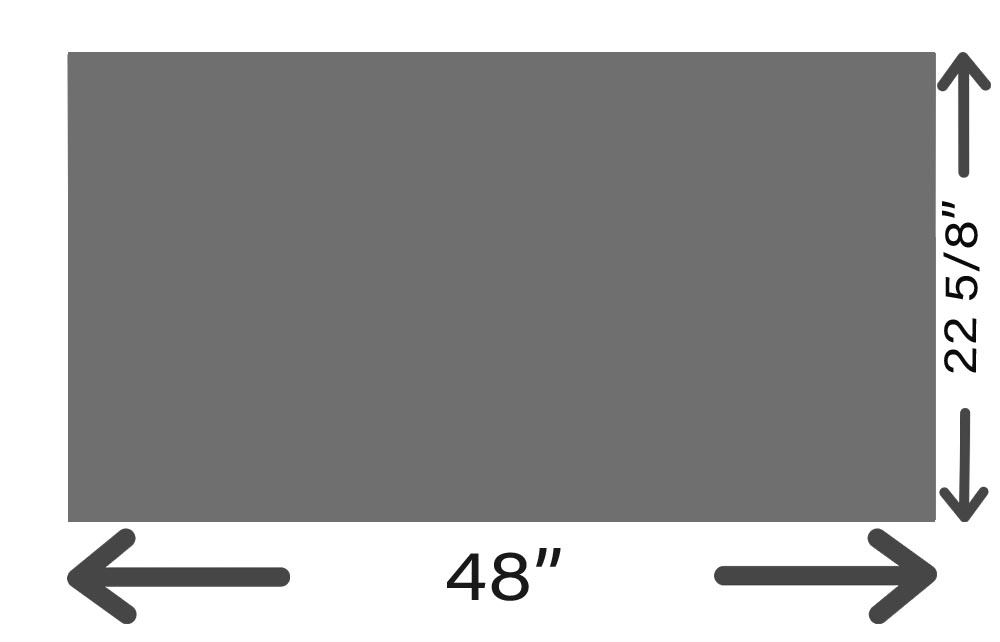
Preparing the floor of your DIY puppy whelping box
For this step you will need one full piece of the 48″ melamine shelving.
Measure to a width of 22 5/8″ and rip with your table saw or circular saw as shown in the diagram below.
Preparing the door tracks for your DIY Puppy Whelping box
For this step you will need the 48″ shelving track.
Measure 18 3/4″ and cut at an angle towards the slide area with your angle grinder and cut off wheel. Round the edges to prevent any cuts from happening when reaching into the whelping box.

Repeat the process for the other side of the door.
Make sure the angles are pointing in towards the door opening as shown in the diagram above.
Using the 1/8″ drill bit and countersink bit, drill a few extra holes evenly spaced apart and countersink the holes.
This will ensure the door slides to operate properly and prevent them from hanging up on protruding screw heads.
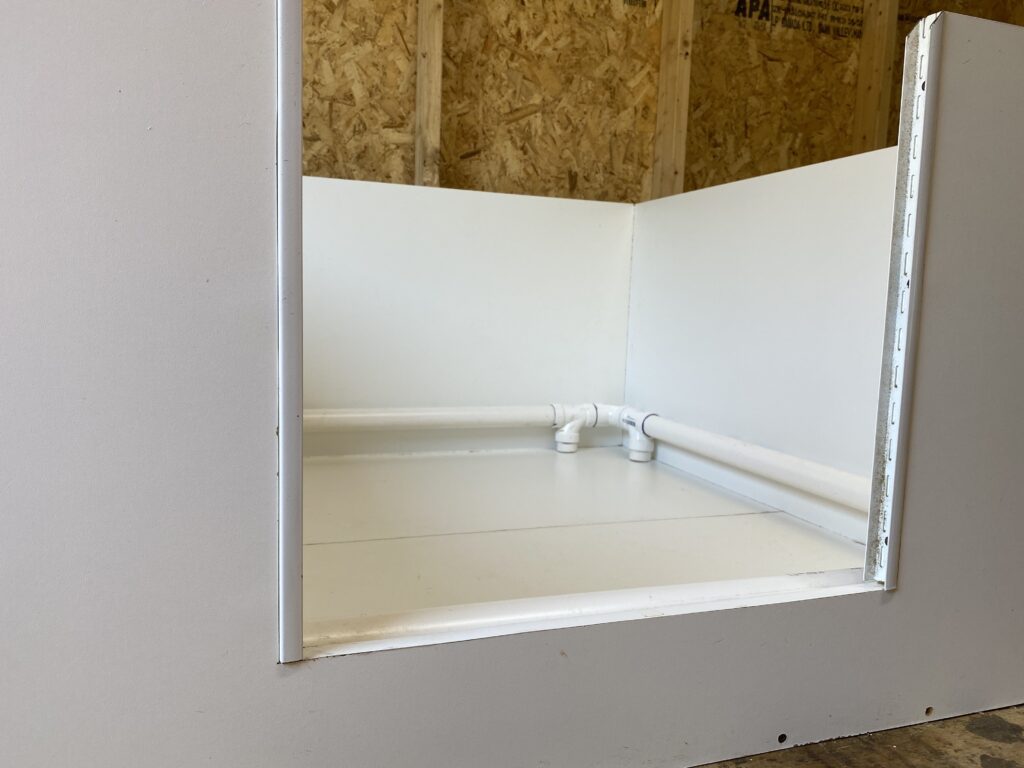
Assembling the DIY puppy whelping box
Assembling the whelping box is easy!
First you will need one full 48″ melamine shelf and also the shelf you cut down to 22 5/8″ width in the previous step.
Lay them flat out on the floor side by side as shown in the diagram below.
Next you will need the door panel that you cut in the previous step.
Measure from the bottom 3/8″ and drill holes with the 1/8″ drill bit evenly spaced across the length of the door panel, this usually requires around 6 screw holes.
When finished, countersink the holes and prepare the panel for installation.
Stand the panel on end and join it to the front long facing floor panel.
Using the #6 2″ drywall screws, attach the front of the whelping box.
Repeat the process for the back of the whelping box.
Use the same process for the sides, with the exception of drilling additional holes on both width ends to attach to the front and back panels of the whelping box.
Installing the door slide tracks in the DIY puppy whelping box
Place the door slide tracks on the inside edge of the door opening, and utilize the #6 2″ drywall screws to attach them inside the openings.
Make sure they are level with the panel inside and outside as well as the top and bottom.
Preparing the pig rails for the DIY puppy whelping box
In this segment you will need all of the PVC supplies in the list and your PVC cutter.
Start out by cutting 2 pieces of PVC pipe 33″ long
Next, cut 2 pieces of PVC pipe to 35″ long.
Lastly you will need to cut 8 pieces 1 1/2″ long.
Assemble the corners as shown in the diagram below.
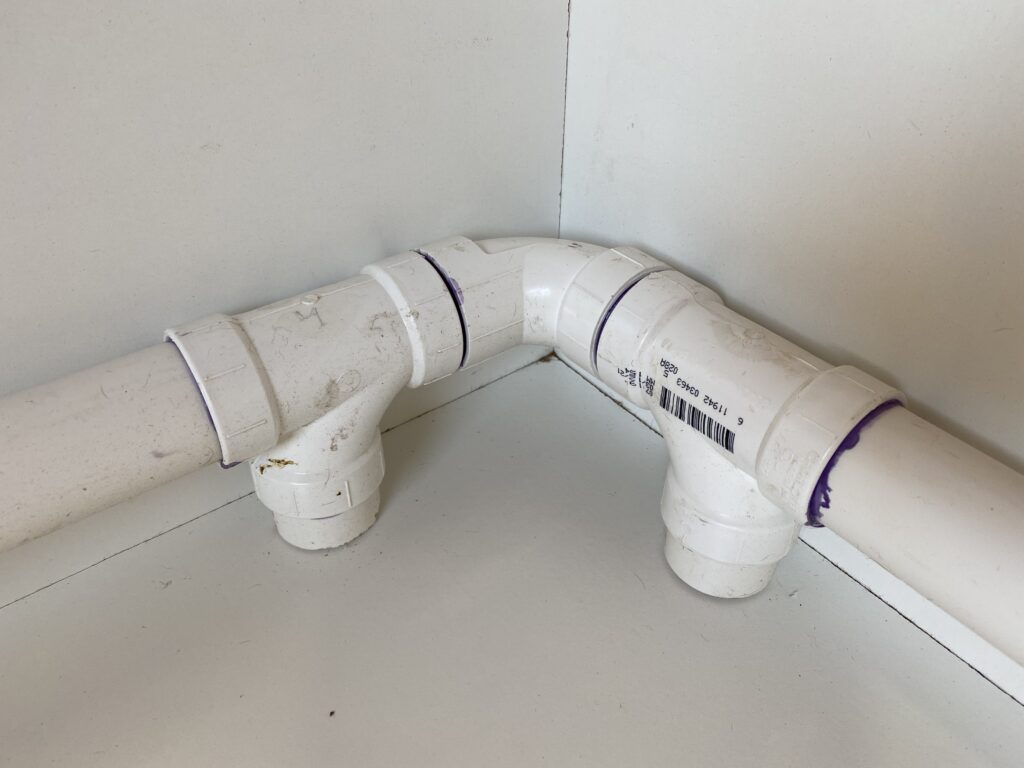
Make a dry run before gluing all of the parts together to ensure a proper fit.
The pig rails should easily slide in and out of the whelping box. It should be a snug fit when properly installed.
Primer and glue all the PVC pieces together.
Congratulations! You have just completed the DIY puppy whelping box.
You may want to purchase a few whelping pads to ensure the comfort of mom and puppies. It also makes it a lot easier to clean up.
We like to use odoban for easy clean up and odor control.
We hope this tutorial was helpful for you.
This whelping box design can be adjusted in size to fit your type of dog.
***Optional*** You may also consider padding and protecting the inside with these foam mats. They work great for the comfort of mom and also will prevent the whelping pads from sliding around.
Add the finishing touches by using the veneer edging and cover all exposed edges of the melamine material.
If you enjoyed this tutorial, and decided to build your own DIY puppy whelping box, please let us know how it turned out.
What do you line your whelping box with?
We like to use these whelping pads for our whelping box. They help ensure the safety and comfort of mom and puppies.
You can also use incontinence bed pads, as they are very absorbent and can help keep your whelping box clean and sanitary.
Can I use a kiddie pool as a whelping box?
A kiddie pool is not a good long term solution for a whelping box.
Puppies are able to escape easily, and it does not provide a safe atmosphere.
They are very difficult to clean due to the molds that are used for the pools.
There are small crevices in the molds that can trap bacteria and pose a risk to your
What do you put in your whelping box?
We like to use whelping pads inside our whelping box.
You can also opt for a puppy nest warmer to keep the puppies warm and comfortable. We like to use a thermostat controlled nest warmer.
Pig rails are a very important item to have in your whelping box. These help ensure the safety of your puppies when they are small. Pig rails help prevent mom from laying on the puppies and suffocating them.
Do I really need a whelping box?
The answer is YES! A puppy whelping box is an essential part of breeding dogs.
A whelping box ensures the safety and security of your puppies.
This also helps to provide a sanitary environment and a controlled atmosphere for your dog.
Related Posts: How long is a dog pregnant?
This post contains affiliate links, which means we make a small commission at no extra cost to you. See our full disclosure Privacy Policy.
Contents